
Vertical Doors, Inc. Installation Tech Tips
Use these Vertical Doors, Inc. installation tech tips with the current instructions supplied with your genuine VDI kit. This page explains the installation checks that most often affect door alignment, hinge movement, wiring clearance, shock protection, lubrication, and long-term operation.
Start with the correct vehicle-specific instructions. Vehicles, kit revisions, mounting surfaces, brackets, wiring paths, and clearance requirements can differ. If this page, a video, or an older manual differs from the instructions supplied with your kit, use the supplied instructions and contact our team before continuing.
Essential VDI Tech Tip videos
These four Vertical Doors, Inc. videos explain installation checkpoints used across many VDI kits. Continue to follow the instructions supplied with the exact vehicle-specific kit.
Adjust the horizontal door movement
Install the VDI shock
Grease the spherical ball bearing
Align the door with the factory striker and lock the adjustment
Return the door to its recorded factory latch-to-striker relationship. Do not move the factory striker merely to hide incorrect hinge alignment unless the vehicle-specific instructions require striker movement. The latch should meet the striker without lifting, dropping, slamming, or forcing the door.


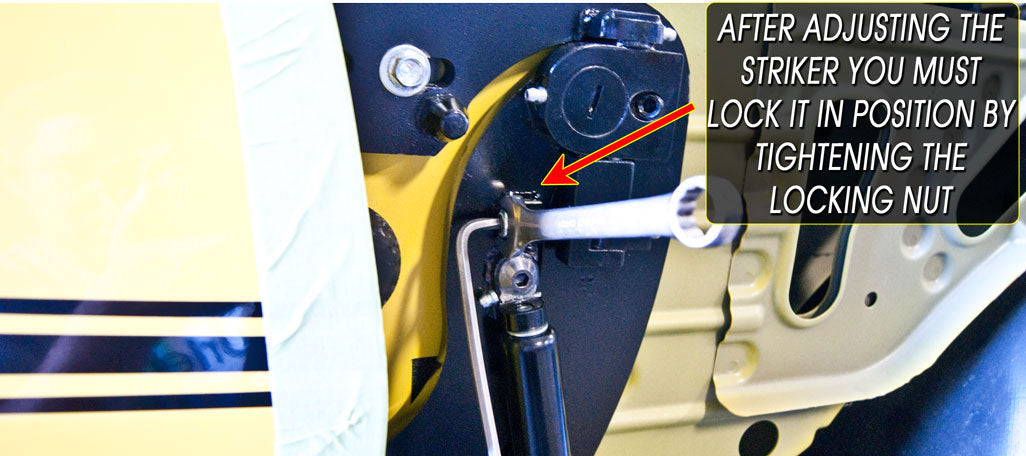
Cycle the door repeatedly after every meaningful adjustment. Recheck panel gaps, latch engagement, horizontal movement, vertical movement, wiring, shock, fender clearance, and locking hardware before reinstalling removed panels.
Checks before adjusting a VDI door conversion kit
- Keep the factory door supported and attached unless the instructions for your exact kit direct otherwise. Do not let the door hang from wiring, one loose hinge, or a partially installed shock.
- Confirm the correct kit and instructions. Match the vehicle year, make, model, body style, VDI part number, left- or right-side hinge, hardware, and shock.
- Record the factory door position. Photograph and measure the gaps and latch-to-striker relationship before loosening the factory hinges.
- Seat the VDI hinge on a flat mounting surface. Correct only the area identified in the vehicle-specific instructions. The hinge must not rock or bridge across a raised bracket, seam, or uneven apron surface.
- Check both hinge adjustments. Set horizontal alignment and vertical movement in the sequence supplied with the kit, then secure the locking hardware.
- Provide only the clearance required by the instructions. Many applications require trimming or rolling a non-visible inner-fender lip. Cut only enough for the swing arm and wiring to move freely, smooth the finished edge, and protect exposed metal.
- Do not reinstall the fender too early. First verify alignment, wiring clearance, fasteners, threadlocker, lubrication, and repeated door operation.
Mark the factory door location before removing the hinges
This is one of the most important parts of a VDI installation. Before loosening the factory hinges, mark the door position on the horizontal and vertical planes. Measure the distance between the body or apron and the front edge of the door near the upper and lower hinges. Photograph the panel gaps and the latch-to-striker relationship.

Prepare the mounting surface and verify clearance
The VDI hinge must sit flat against the vehicle mounting surface. Some vehicles require an identified bracket, seam, or apron area to be modified before the hinge can sit flush. Do not grind, cut, hammer, or remove an unidentified structure based on a general video. Follow the exact photographs and directions supplied with your kit.
After the hinge is mounted, check the swing arm, adjustment hardware, shock, wire harness, wire boot, fender, door edge, and nearby trim through the complete outward, upward, downward, and closing movement. Correct interference before final assembly.
VDI shock installation and warranty protection
A VDI gas shock normally cannot be compressed by hand. Shock pressure depends on the vehicle application. The shock is designed to work after the correct hinge is mounted to the vehicle and the shock is installed in the specified orientation. Never improvise a compression method or clamp the shock body or shaft.
Grease, threadlocker, and shock warranty requirements

Follow Steps 1 through 5 in order. Complete the grease and threadlocker preparation before threading the shoulder bolt into the hinge.
- Grease the smooth body of the shoulder bolt. Keep grease off the threads.
- Grease the shock-end contact surfaces shown in the current instructions. Complete this step before threading the shoulder bolt into the hinge.
- Insert the shoulder bolt through the top shock end before applying threadlocker. Make sure the underside contact surface of the shock end is greased. Remove any grease from the shoulder-bolt threads, then apply liquid red threadlocker to the clean threads. This order helps prevent grease from contaminating the threadlocker.
- Thread the shoulder bolt in by hand. The bottom face of the bolt shoulder must sit completely flush against the machined hinge mounting surface with no visible gap.
- VDI recommends torquing shoulder bolt to 30 ft-lb (360 in-lb). This recommendation applies only to this specific shoulder bolt installed in the current VDI shock-mounting application with liquid red threadlocker.

Do not use pliers or other gripping tools on the shock body or shaft.
Do not scratch, paint, coat, or place foreign material on the shock body or shaft. Tool marks and surface contamination void applicable shock warranty coverage.
Critical shoulder-bolt seating requirement: The shoulder must contact the hinge mounting surface. Tightening the bolt head or reaching the torque setting does not confirm that the shoulder is seated correctly.
A visible gap leaves the narrow relief area between the shoulder and threads unsupported. Door movement can place a bending load directly on this area and cause the shoulder bolt to break.
Do not use the torque wrench to pull an unseated bolt into position. If the shoulder does not sit flush by hand, remove the bolt and inspect for cross-threading, debris, burrs, paint, incorrect hardware, misalignment, or threads bottoming inside the hole. Correct the cause before continuing.
Warranty notice: Damage caused by an improperly seated shoulder bolt, cross-threading, incorrect hardware, or failure to follow the required installation and torque procedure may not be covered under the applicable warranty.
VDI hinge and shock-bearing maintenance
- Hinge zerk fittings: Use a high-quality automotive or marine grease designed for a grease gun. Under normal conditions, service the fittings about once every one to two years. Outdoor exposure, contamination, climate, and use may require more frequent service.
- Shock spherical bearing: Inspect and lubricate every three to six months or as needed. Use WD-40 or a similar cleaner/lubricant to flush dirt from the bearing area, cycle the door several times, then apply white lithium grease for longer-lasting lubrication.
- After maintenance: Wipe away excess material and keep lubricant off the gas-shock body and shaft. Recheck the door through its complete movement.
WD-40 Specialist White Lithium Grease is one commonly available example. Follow the lubricant manufacturer’s directions and the current maintenance instructions for your kit.
What should I do if a zerk grease fitting is damaged?

Some VDI hinge assemblies use press-in or drive-type grease fittings. These fittings can shear when a grease-gun coupler is pulled sideways. A lever-release coupler or needle-style attachment may reduce side loading during service.
Do not drill, tap, drive in a replacement, or push a broken fitting into the hinge until our team confirms the correct repair for the exact hinge and fitting location. Send clear photographs of the fitting, hinge, kit part number, vehicle, and proof of purchase so we can identify the appropriate part and procedure.
Vehicle-specific installation tips and videos
Use these resources only for the listed vehicle and procedure. They do not replace the current instructions supplied with the matching VDI kit.
Chevrolet Corvette C8
Dodge Charger
Research a shop’s relevant alignment, wiring, body-panel, and VDI kit experience before authorizing installation.
2004-2008 Chrysler Crossfire washer-reservoir note
The windshield-washer reservoir may need to be modified or replaced with a smaller suitable reservoir to provide the required installation clearance. Confirm the exact requirement in the instructions supplied with the Crossfire kit.

2003-2005 Hummer H2 clearance reference
Use the current Hummer H2 instructions to identify the exact cut and required finished clearance. Cut only the instructed area, smooth every edge, protect exposed metal, and verify full hinge movement before reassembly.


Get Vertical Doors, Inc. technical support
Before contacting us, gather the vehicle year, make, model, body style, VDI part number, proof of purchase, installation stage, clear photographs, and a short video showing the question through the complete door movement. This information helps our team identify the kit and understand the condition more quickly.
Reference notice: Tech tips, images, and videos are general or application-specific references. A vehicle may differ because of production changes, previous repairs, collision history, body modifications, aftermarket parts, or kit revisions. Use the current instructions supplied with the exact kit and stop to contact VDI when the vehicle does not match the documented procedure.